使用helm安装apisix

Apache APISIX 是一个动态、实时、高性能的云原生 API 网关,提供了负载均衡、动态上游、灰度发布、服务熔断、身份认证、可观测性等丰富的流量管理功能。

安装

新建pv:

1
2
3
4
5
6
7
8
9
10
11
12
13
14
15
16
17
18
19
20
21
22
apiVersion: v1
kind: PersistentVolume
metadata:
name: etcd-pv-0
namespace: apisix
labels:
type: local
spec:
nodeAffinity:
required:
nodeSelectorTerms:
- matchExpressions:
- key: kubernetes.io/hostname
operator: In
values:
- ubuntu
capacity:
storage: 50Gi
accessModes:
- ReadWriteOnce
hostPath:
path: "/root/data/etcd-pv-0"
1
2
3
4
5
6
7
8
9
10
11
12
13
14
15
16
17
18
19
20
21
22
apiVersion: v1
kind: PersistentVolume
metadata:
name: etcd-pv-1
namespace: apisix
labels:
type: local
spec:
nodeAffinity:
required:
nodeSelectorTerms:
- matchExpressions:
- key: kubernetes.io/hostname
operator: In
values:
- ubuntu
capacity:
storage: 50Gi
accessModes:
- ReadWriteOnce
hostPath:
path: "/root/data/etcd-pv-1"
1
2
3
4
5
6
7
8
9
10
11
12
13
14
15
16
17
18
19
20
21
22
apiVersion: v1
kind: PersistentVolume
metadata:
name: etcd-pv-2
namespace: apisix
labels:
type: local
spec:
nodeAffinity:
required:
nodeSelectorTerms:
- matchExpressions:
- key: kubernetes.io/hostname
operator: In
values:
- ubuntu
capacity:
storage: 50Gi
accessModes:
- ReadWriteOnce
hostPath:
path: "/root/data/etcd-pv-2"

下载apisix-helm-chart

1
git clone https://github.com/apache/apisix-helm-chart.git

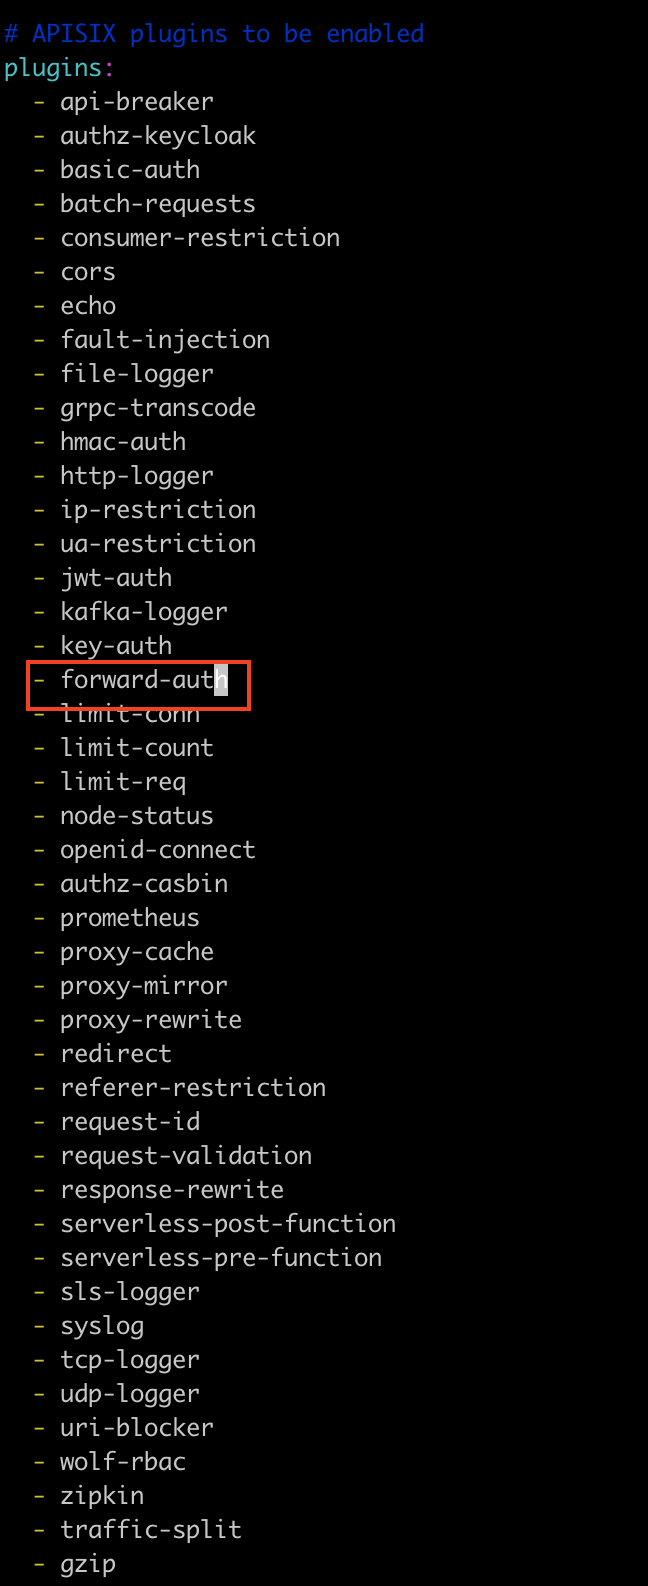
切换到apisix-helm-chart/charts/apisix目录,修改values.yaml文件,添加forward-auth插件:

helm-apisix-1

执行以下命令安装apisix

1
helm upgrade --install apisix --set admin.allow.ipList="" --set etcd.volumePermissions.enabled=true --namespace apisix -f values.yaml .

执行以下命令转发apisix-admin的9180端口:

1
kubectl port-forward service/apisix-admin -n apisix 9080:9180

测试apisix

新建upstream

1
2
3
4
5
6
7
curl "http://127.0.0.1:9080/apisix/admin/upstreams/1" -H "X-API-KEY: edd1c9f034335f136f87ad84b625c8f1" -X PUT -d '
{
"type": "roundrobin",
"nodes": {
"httpbin.org:80": 1
}
}'

新建route

1
2
3
4
5
6
curl "http://127.0.0.1:9080/apisix/admin/routes/1" -H "X-API-KEY: edd1c9f034335f136f87ad84b625c8f1" -X PUT -d '
{
"uri": "/get",
"host": "httpbin.org",
"upstream_id": "1"
}'

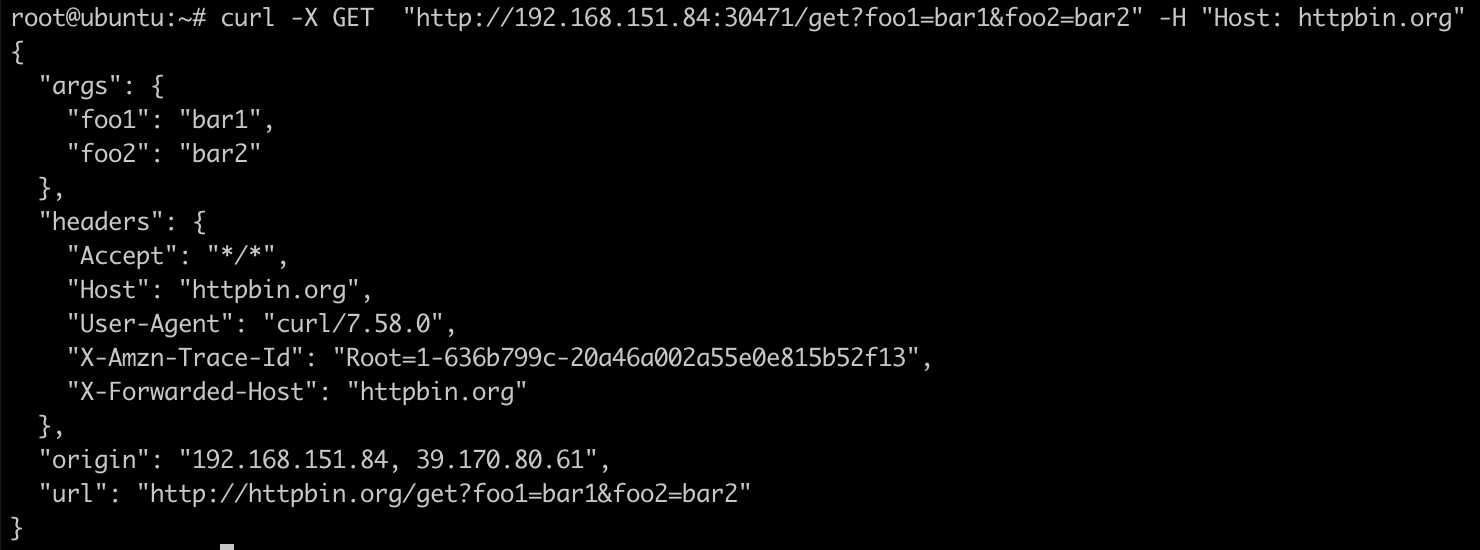
访问apisix-gateway的NodePort端口测试效果:

1
curl -X GET  "http://192.168.151.84:30471/get?foo1=bar1&foo2=bar2" -H "Host: httpbin.org"

helm-apisix-2

forward-auth插件

https://apisix.apache.org/zh/docs/apisix/plugins/forward-auth/

Forward Auth插件能巧妙地将认证与授权逻辑转移至专门的外部服务中,网关会将用户的请求转发至认证服务中,并在认证服务响应非20X状态时,阻止原有请求并替换结果。通过这样的方式,就可以实现认证为通过时,返回自定义报错或用户重定向至认证页面。

helm-apisix-3

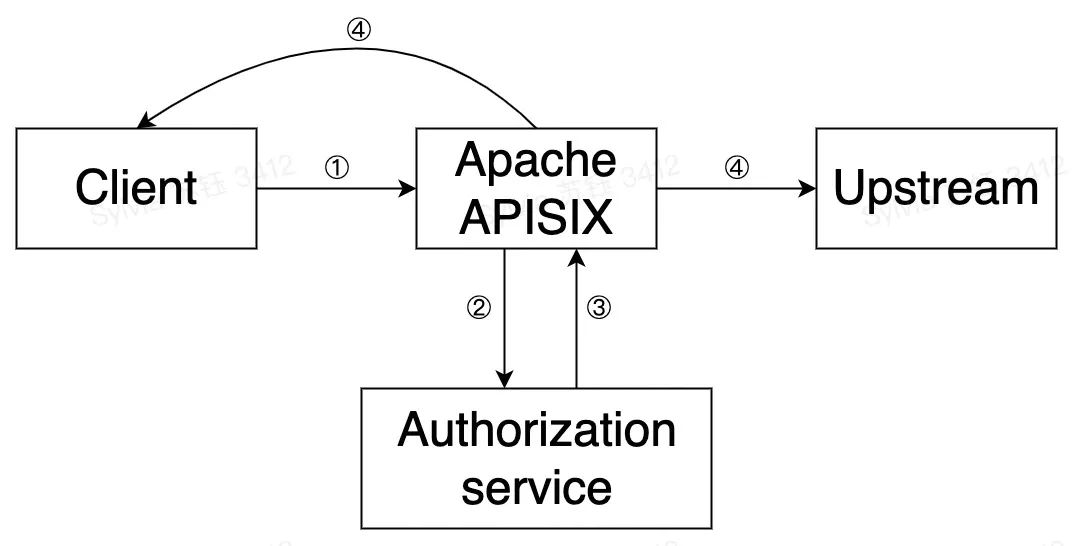
关于forward-auth插件在Apache APISIX中的运行原理与流程如上图所示,具体总结为以下几步:

  1. 由客户端向APISIX发起请求
  2. 由APISIX向用户配置的认证服务发起请求
  3. 认证服务响应(2xx或异常状态)
  4. APISIX会根据认证服务响应,决定向上游转发请求或直接向客户端发送拒绝响应

属性

名称 类型 必选项 默认值 有效值 描述
uri string 设置authorization服务的地址
ssl_verify boolean true [true,false] 当设置为true是,验证SSL证书
request_method string GET [“GET”,”POST”] 客户端向authorization服务发送请求的方法。当设置为POST时,会将request body转发至authorization服务
request_headers array[string] 设置需要由客户端转发到authorization服务的请求头。如果没有设置,则只发送APISIX提供的headers(例如:X-Forwarded-XXX)
upstream_headers array[string] 认证通过时,设置authorization服务转发至upstream的请求头。如果不设置则不转发任何请求头
client_headers array[string] 认证失败时,由authorization服务向client发送的响应头。如果不设置则不转发任何响应头。
timeout integer 3000ms [1, 60000]ms authorization服务请求超时时间
keepalive boolean true [true, false] HTTP长连接
keepalive_timeout integer 60000ms [1000, …]ms 长连接超时时间
keepalive_pool integer 5 [1, …]ms 长连接池大小

APISIX将生成并发送如下所示的请求头到认证服务:

Scheme HTTP Method Host URI Source IP
X-Forwarded-Proto X-Forwarded-Method X-Forwarded-Host X-Forwarded-Uri X-Forwarded-For

官方示例

使用Apache APISIX无服务器插件模拟服务:

1
2
3
4
5
6
7
8
9
10
11
12
13
14
15
16
17
18
19
20
21
22
23
24
25
curl -X PUT 'http://127.0.0.1:9080/apisix/admin/routes/auth' \
-H 'X-API-KEY: edd1c9f034335f136f87ad84b625c8f1' \
-H 'Content-Type: application/json' \
-d '{
"uri": "/auth",
"plugins": {
"serverless-pre-function": {
"phase": "rewrite",
"functions": [
"return function (conf, ctx)
local core = require(\"apisix.core\");
local authorization = core.request.header(ctx, \"Authorization\");
if authorization == \"123\" then
core.response.exit(200);
elseif authorization == \"321\" then
core.response.set_header(\"X-User-ID\", \"i-am-user\");
core.response.exit(200);
else core.response.set_header(\"Location\", \"http://example.com/auth\");
core.response.exit(403);
end
end"
]
}
}
}'

在指定 Route 上启用 forward-auth 插件:

1
2
3
4
5
6
7
8
9
10
11
12
13
14
15
16
17
18
19
curl -X PUT 'http://127.0.0.1:9080/apisix/admin/routes/1' \
-H 'X-API-KEY: edd1c9f034335f136f87ad84b625c8f1' \
-d '{
"uri": "/headers",
"plugins": {
"forward-auth": {
"uri": "http://127.0.0.1:9080/auth",
"request_headers": ["Authorization"],
"upstream_headers": ["X-User-ID"],
"client_headers": ["Location"]
}
},
"upstream": {
"nodes": {
"httpbin.org:80": 1
},
"type": "roundrobin"
}
}'

完成上述配置后,可通过以下三种方式进行测试:

  • 在请求头中发送认证的详细信息:
1
2
3
4
5
6
7
8
9
10
11
12
curl http://192.168.151.84:30471/headers -H 'Authorization: 123'

{
"headers": {
"Accept": "*/*",
"Authorization": "123",
"Host": "192.168.151.84",
"User-Agent": "curl/7.58.0",
"X-Amzn-Trace-Id": "Root=1-636b7ad7-6d7b9bf83d77298e77f7e3d2",
"X-Forwarded-Host": "192.168.151.84"
}
}
  • 转发认证服务响应头到 Upstream
1
2
3
4
5
6
7
8
9
10
11
12
13
curl http://192.168.151.84:30471/headers -H 'Authorization: 321'

{
"headers": {
"Accept": "*/*",
"Authorization": "321",
"Host": "192.168.151.84",
"User-Agent": "curl/7.58.0",
"X-Amzn-Trace-Id": "Root=1-636b7afc-3e17213619a515541afab2fd",
"X-Forwarded-Host": "192.168.151.84",
"X-User-Id": "i-am-user"
}
}
  • 当授权失败时,认证服务可以向用户发送自定义响应:
1
2
3
4
5
6
7
8
9
10
11
12
13
14
15
16
17
curl -i http://192.168.151.84:30471/headers

HTTP/1.1 403 Forbidden
Date: Wed, 09 Nov 2022 10:03:48 GMT
Content-Type: text/plain; charset=utf-8
Transfer-Encoding: chunked
Connection: keep-alive
Location: http://example.com/auth
Server: APISIX/2.15.0

<html>
<head><title>403 Forbidden</title></head>
<body>
<center><h1>403 Forbidden</h1></center>
<hr><center>openresty</center>
</body>
</html>

测试示例

创建如下认证服务:

1
2
3
4
5
6
7
8
9
10
11
12
13
14
15
16
17
18
19
20
21
22
23
24
25
@RestController
@Slf4j
public class AuthController {
@Autowired
HttpServletRequest request;

@RequestMapping("/**")
public ResponseEntity<String> api() {
log.info("path {}", request.getServletPath());
log.info("method {}", request.getMethod());
return new ResponseEntity<>("api", HttpStatus.OK);
}


@RequestMapping("/auth")
public ResponseEntity<String> auth() {
final Enumeration<String> headerNames = request.getHeaderNames();
while (headerNames.hasMoreElements()) {
final String key = headerNames.nextElement();
final String value = request.getHeader(key);
log.info("{} = {}", key, value);
}
return new ResponseEntity<>("auth", HttpStatus.OK);
}
}

设置测试路由:

1
2
3
4
5
6
7
8
9
10
11
12
13
14
15
16
17
18
19
curl -X PUT 'http://127.0.0.1:9080/apisix/admin/routes/1' \
-H 'X-API-KEY: edd1c9f034335f136f87ad84b625c8f1' \
-d '{
"uri": "/prod-api/*",
"plugins": {
"forward-auth": {
"uri": "http://192.168.151.23:18080/prod-api/admin-api/system/resource/verify",
"request_headers": ["Authorization"],
"upstream_headers": ["X-User-ID"],
"client_headers": ["Location"]
}
},
"upstream": {
"nodes": {
"192.168.151.23:18080": 1
},
"type": "roundrobin"
}
}'

访问接口,测试认证服务

1
2
3
curl http://192.168.151.84:30471/api/index -H 'Authorization: 123'

api

认证服务打印如下信息:

helm-apisix-4

如果auth接口返回HttpStatus.UNAUTHORIZED,解耦返回auth。

当接口认证通过时返回upstream的内容,接口认证失败时返回认证接口的内容。

鉴权接口开发

  1. 提供/auth接口。
  2. 接口通过http请求头中的x-forwarded-methodx-forwarded-urix-forwarded-protox-forwarded-hostx-forwarded-for等参数(可以添加自定义参数)来判断接口是否有权限。
  3. 如果有权限返回状态200
  4. 没有权限返回非2xx的状态,并返回用户提示内容(比如提示用户没有权限,重定向到登录页面)